This article was written by Lee Newman a friend of mine who is known as ‘The Old Trap Collector‘. It is reproduced here with his permission.
 Small ground vermin such as rats, grey squirrels and the weasel tribe can be effectively trapped by a tried and tested technique known as tunnel trapping. Such vermin are naturally inquisitive and will always investigate both natural and artificial tunnels placed strategically in the animals’ runways. Vermin will follow recognised routes whilst hunting, just as we use footpaths and roadways to go about our own business. Rarely will they break cover and will happily travel along hedge bottoms, fence lines, dry ditches and such like in their search for food. If they do have to cross an open gateway they will take the shortest route possible and will seek sanctuary at the first opportunity. This fact alone makes our job as a trapper a little easier.
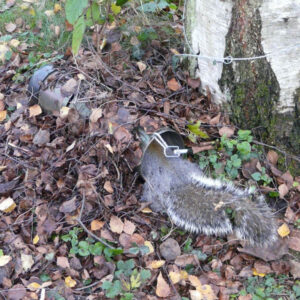
The Approved Traps Act allows us to use the traps listed within the confines of both natural and artificially constructed tunnels. Such tunnels may simply be a naturally forming one within the exposed roots of a tree or in a more elaborate and purposefully built tunnel.
Materials for tunnel construction should be carefully chosen by the ‘keeper. Natural camouflage using vegetation and local materials allows the tunnel to appear more in keeping with its surroundings which will have a twofold effect; it will create less suspicion by the quarry and help to avoid detection by the general public. For this reason it should also be sited away from prying eyes and public footpaths wherever possible.
Ideally tunnels should be 18 inches to 3 feet in length to allow that crucial chink of light to appear at the other end – vermin cannot resist entering such a hole and will fall victim to their own curiosity. Any longer and the tunnel will appear too dark, and any shorter will also lose some of the desired effect.
The size of the tunnel is critical. It should be large enough to allow the unimpeded action of the trap and no larger. If the tunnel is too big then there is always the danger of the trap failing to grip its victim squarely or to avoid a catch altogether. Care must also be taken to ensure that there is sufficient space to facilitate the removal of the safety catch on some traps once set.
Tunnels can be baited with fresh offal or rabbit paunch for mustelids, or with maize or corn for rats and grey squirrels. The urine of stoats and weasels expressed at the trap site will serve as an excellent attractant for others of the same species, but don’t forget that the trap is set for all ground vermin that come along and nothing is more certain to make a rat avoid a trap as the scent of its greatest enemy, the stoat.
Clay land drain sections and plastic pipes make excellent tunnels for the Fenn and Springer traps. They should large enough for the trap to operate properly but no more, ensuring a successful catch. The orange coloured clay land drain pipes can be found in sections of 18 inches which are ideal for this purpose. They blend in easily, are long lasting, and are superbly sized for the smaller Mk III Fenn. The larger Fenn traps will fit handsomely inside the plastic 6 inch diameter pipes, and will close up around the victim ensuring that nothing can be thrown free of the jaws once the pan has been depressed underfoot. Some ‘keepers use a split tunnel of two smaller lengths of pipe, which will work but I have always had better results from the trap being totally inside the tube.
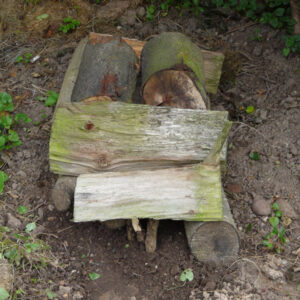 A good all round tunnel can be made from 6 inch rough sawn and untreated timber cut into two foot lengths. It must be untreated as the smell of the wood preservative will keep vermin away from the trap for a considerable time. Only three sections are needed as the earth will form the base of the tunnel. These tunnels should form the backbone of the permanent tunnel trap network for the shoot and should be sited accordingly.
Another easy to make tunnel I have used is made from stone blocks. These make excellent permanent sites and will last for many years once the trouble has been taken to make and site them properly. These are particularly useful for the larger Imbra and Juby traps as the tunnel can easily be modified in construction to accommodate the larger jaws. Stone tunnels also blend in very nicely and are especially attractive for the pests. They should not be made to look out of keeping with the surroundings, however, as they will draw attention to themselves and encourage trap thieves.
It is always worth having a few moveable tunnels especially on the rearing field where they can be placed alongside the rearing huts and feed bins. These can be of the ordinary wooden run through variety or be of the ‘box’ design a small pop hole at each end to keep out inquisitive game birds that will often pace up and down the perimeter of rearing and release pens.
Whatever the site or type of tunnel employed, two straight hazel wands at the entrance will serve to guide the quarry over the centre of the trap pan as well as keeping out game birds searching for a dry spot for a dust bath.
Traps should be sited wherever vermin are known to exist. A thorough network of carefully constructed tunnels will account for a lot of pests in a very short time, and should span every hedgerow, ditch, stream, waterway and wall. Inspecting the traps either on foot or by vehicle should take you into every covert, game crop and holding area on the shoot. One way to ensure that all areas have been covered is to use a sketch map of the shoot, annotated with each area of woodland, hedgerow, watercourse and road. On the map, each trap site and fox wire can be marked and any potential breeches in the defences can easily be spotted and dealt with.
Traps should be placed in culverts that run under the roads and tracks, alongside or even within every major stone wall, and in each significant hedgerow (especially those which lead to coverts and from adjoining shoots). Try to think like the creatures you are targeting – where would they run, hunt and hide?
Release pens are a magnet for vermin and you should also protect the area with a concentration of traps. Under feed bins and alongside wire fences are all telling places and can easily be inspected during the daily feeding routine.
You will always have tunnels that catch better than others. Try to work out why; are they better sited or constructed? If this is the case then learn from this and build your others in a similar way. After a while most traps will have spells of inactivity due to the amount of pests that have been cleared – keep them set and they will continue to work for you. It is tempting to spring them off and ignore your duties but they really must remain set or your good work up to know will all be in vain.
There will always be seasonal theme of success with your traps. During the spring the animals will move about more frequently in search of mates and food. There is also the consideration of ground cover to take into account. Moorland ‘keepers have to contend with a low, thick ground cover all year round, which causes a difficulty in spotting the vermin going about their business, or discovering evidence such as the remains of predation. The lowland ‘keeper will encounter a similar problem during the summer months due to the standing crops. Once the harvest has been recovered the task of dealing with the pests will be made much easier.
To this end it is apparent that much of the success of the vermin trapper will depend upon the season and month of the year. His most killing times are during the months of February, March and April before the cover gets too high and again for the months immediately after harvest. This begs the question of whether it is worth maintaining the traps at other times of the year and to a certain degree this is true, but one must look at the benefit of ridding the shoot of one bitch stoat in Winter will actually save a full litter in springtime.
After harvest, the stubbles are left for a short time before they are turned over in preparation for the next crop. With the screen of the crop gone and a barren landscape, by comparison, left in its place small ground vermin will make full use of the newly ploughed furrows to go about their business. A trap or two sited within a tunnel in the end furrow of a field will efficiently account for a good number of them.
The moorland ‘keeper will have to resort to siting his traps in culverts under roads or tracks away from the public eye and in this type of situation the tunnel trap within or alongside a stone wall or at or near a stream bridge crossing are very often good killing places.
All traps should be well weathered and buried in the earth before use to rid them of factory smells and oil and grease deposits. Light surface rust does not hinder the action of the traps, and since the trigger actions on conventional approved traps are mainly ‘brass to brass’, their sensitivity will be unaffected. Badly rusted traps can be wire brushed to remove the worst of the fouling although I have seldom found this necessary if the traps are regularly catching.
Traps should have a chain or wire cable attached to secure them at the trap site. Never use baler twine or similar to secure the trap; vermin will almost certainly find a weakness or chew through it in an effort to escape. When trap victims are killed instantly then there is still the real possibility that the trap may be pulled at by foxes, badgers or dogs and the stake must hold firm otherwise it will be lost.
For portability and general use steel or wooden pegs should be used for all traps, although they may be stapled to wooden tunnels. Steel pins are hard wearing and will last a lifetime of use and abuse, the downside is that the weight of the trap will increase – a significant consideration when larger numbers are carried. A straight steel peg or pin of approximately 9 inches in length will suffice for clay soils, whereas the length may need to be increased for sandier regions.
A very strong wooden peg may be made from split green ash. 12 inch sections of straight ash timber 5 inches across can be split lengthways into six or eight pegs of a rough triangular section and fashioned into efficient anchors using a small axe or billhook. Wooden pegs should be driven home with a wooden mallet, I always use one made from a section of holly branch with the spur of the branch forming the handle of the mallet. Steel mallets will soon break up the heads of wooden pegs but are fine for steel pins.
All traps should be sprung periodically; say weekly, if no catches are made just to ensure that they are ready to act at a moments notice to light vermin such as rats and weasels. They should be bedded down into the earth at the base of the tunnel so that the pan is flush with the surrounding environment. This will prove valuable for two reasons – firstly the intended vermin will be far less suspicious of the site if it all looks natural, and secondly it will not attract trap thieves which can be a significant problem in some areas.
There is often some controversy between differing schools of thought of whether the set trap should be covered or not. It is not strictly necessary to cover the pan of a trap in most instances but rats, for instance, are particular about where they place their feet and may become suspicious of an exposed trap. I have always found it best practice to cover the trap lightly with fine soil – not too much so that it could hinder the reaction of the trap but enough for it to blend in with the locality. Care should also be taken to ensure that small stones or sticks do not work their way under the pan of the trap when setting them as this could cause vermin to pass over the trap without being caught.
More information on spring traps and accessories in contained in Traps & More Trap Making
One Response to Beginners Guide to Tunnel Trapping